
Last updated: 2023-06-12, Necrom (Update 38 / Patch 9.0.5)

Table of Contents
- Overview
- Gear
- Skills
- Rotations
- Attributes, Mundus Stone, Passives, Food, and CP
- Narrated Videos
- Addons
- Change Log
1. Overview
This PVP build for Stamina Warden in Elder Scrolls Online (ESO) is a beefy brawler that blends AoE damage, debuffs, crowd control, and mobility. Your role is to charge in, pull targets together, stun them, and apply damage and debuffs. This pressure puts opponents on their heels and allows your ranged DPS and healers to cast freely.
This build is optimized for Battlegrounds in Update 38 (Necrom) and performs well in Cyrodiil / Imperial City.
Strengths and Weaknesses
+ Superb AoE damage
+ Superb damage shielding and mitigation
+ Superb armor debuffs
+ Excellent mobility
+ Excellent sustain
+ Good crowd control
– Lacks meaningful ranged DPS capability
– Spammable has high resource cost
– Awkward timing on 2nd blast of Deep Fissure
When I first published this guide in Update 33 (Ascending Tide), Stamden had fallen out of favor so it’s been rewarding to figure out a build that works well. Since Update 35 (Lost Depths), Warden has been in a good spot.
Make sure to bookmark this guide, as I’ll keep it current with each update of ESO. Check the Change Log for the history of tweaks to the build.
2. Gear
This build takes advantage of “backbarring” a 5-pc set; this allows us to squeeze in two 5-pc sets, a 2-pc weapon set, and a mythic. This setup provides high stat density and two potent 5-pc set bonuses.
Frontbar
- 1-pc Gaze of Sithis
- 5-pc Rush of Agony
- 2-pc Titanic Cleave
- 3-pc Wretched Vitality
- 1-pc Magma Incarnate¹
Backbar
- 1-pc Gaze of Sithis
- 5-pc Rush of Agony
- 5-pc Wretched Vitality
- 1-pc Magma Incarnate¹
¹ If you have more sustain than you need, you can replace 1-pc Magma Incarnate with a monster set with Weapon Damage (Balorgh, Kjalnar’s Nightmare, Molag Kena, Nerien’eth, Prior Thierric, or Velidreth) or Offensive Penetration (Archdruid Devyric, Kra’gh, Lady Malygda, or Valkyn Skoria).
Set Mechanics
- Gaze of Sithis (GoS): the most stat dense mythic in the game. Greatly boosts your Healthy (3276) and Armor (4000), which allows you to assign all of your attribute points in Stamina and still have a sizeable Health pool. Also boosts your Health Recovery, but keep in mind with Battle Spirit it’s halved (512 effective)

- Rush of Agony (RoA): pulls enemies within 10m when you land Stampede, and after 2 sec deals PBAoE damage to enemies within 7m of you, not where you landed Stampede. In BGs, this accounts for ~11% of my total damage. The AoE pull synergizes terrifically with the AoE CC and AoE damage mechanics of this build
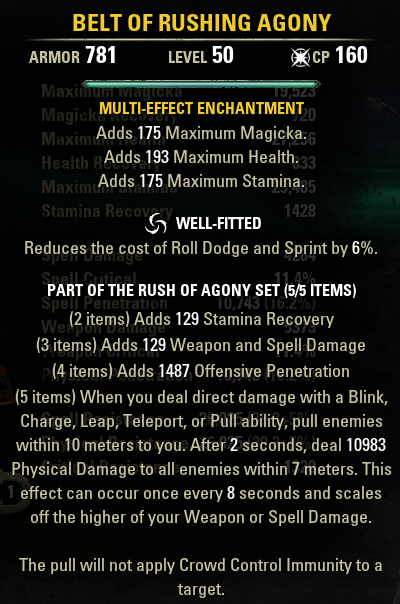
Tooltip shows damage value (10983) with the Major Brutality buff. Keep in mind that this 5-pc set damage — and all damage — is reduced in PVP by 50% due to Battle Spirit.
- Titanic Cleave (TC): increases the damage of Brawler (Cleave morph) based on the number of targets hit. That is, TC makes Brawler hit hard in packed fights, and RoA and TC synergize strongly. The perfected set bonus of 1190 penetration boosts all damage.

- Wretched Vitality (WV): boosts your Stamina and Magicka Recovery when you apply Major or Minor Buffs (or Debuffs). With this build, WV is backbarred (i.e. the 5-pc set bonus is available only on the backbar) as casting Ice Fortress procs both recovery buffs, and these buffs persist when you swap to the frontbar

So, in a nutshell
- RoA and TC boost offense
- GoS boosts defense
- WV boosts sustain
Gear Weights, Traits, and Enchants
- Head: Gaze of Sithis (Heavy) | Reinforced | Tri-Stat
- Shoulders: Magma Incarnate (Medium) | Well-Fitted | Tri-Stat
- Hands: Rush of Agony (Medium) | Well-Fitted | Tri-Stat
- Legs: Rush of Agony (Medium) | Well-Fitted | Tri-Stat
- Chest: Wretched Vitality (Heavy) | Reinforced | Tri-Stat
- Waist: Wretched Vitality (Light) | Well-Fitted | Tri-Stat
- Feet: Rush of Agony (Medium) | Well-Fitted | Tri-Stat
- Neck: Rush of Agony | Infused | Weapon Damage
- Ring 1: Rush of Agony | Infused | Weapon Damage
- Ring 2: Wretched Vitality| Infused | Weapon Damage
- Frontbar Weapon: Perfected Titanic Cleave (Maul) | Sharpened | Weapon Damage
- Backbar Weapon 1: Wretched Vitality (Dagger) | Defending | Poisoned Weapon
- Backbar Weapon 2: Wretched Vitality (Dagger) | Defending | Fiery Weapon
Other Mythic Options
- Markyn Ring of Majesty (MRoM): significantly boosts your Weapon Damage (200) and Armor (2314) — both are valuable for melee builds. MRoM is worth slotting even if you only have two 3-pc bonuses, due to the stat density
- Sea-Serpent’s Coil (SSC): provides Major Courage (+430 Weapon Damage) and Major Berserk (+10% damage), but it snares you by 40% for 10 sec. SSC has high uptime and enables higher burst, but you have to cast Bird of Prey every 6 seconds to negate the snare
Thoughts on Gearing Properly
It can be expensive to acquire gear, improve it, and enchant it. I’ve tested different sets, traits, and enchants to arrive at this build, so you can invest your time and gold with confidence.
Most build guides lack meaningful explanation about gear weights, traits, enchants, and slots to use for specific sets. Therefore, here is the detailed rationale for my setup:
- Maul with Sharpened trait is the frontbar weapon due to the high Penetration. If you haven’t farmed Veteran Dragonstar Arena, you can use the non-Perfected Maul from normal Dragonstar Arena. That said, the 1190 penetration from vDSA is worth farming
- Both backbar weapons are daggers, with Defending trait to boost mitigation while you buff, heal, and run. Dual wield (DW) enables slotting of Quick Cloak, and DW dagger healing output is strong. DW instead of restoration staff may sound counterintuitive, so let’s look at their respective healing outputs:
- Warden’s excellent Accelerated Growth and Nature’s Gift passives only trigger from Green Balance skills, so we only slot class-based heals. Given that, if we backbarred a restoration staff, the only weapon passive for healing we’d benefit from is Restoration Expert (+15% healing on allies under 30% Health)
- With HoTs, the moment a target’s health reaches 30%, you lose the benefit of the Restoration Expert passive
- Dual wield daggers boost healing via higher Weapon Damage (Dual Wield Expert passive) and +7.4% Crit Chance (Twin Blade and Blunt passive). The healing skill tooltips are ~5.6% higher than restoration staff
- Therefore, at 30+% health, dual wield daggers heal for ~5.6% more than restoration staff and have a 7.4% higher Crit Chance. Under 30% health, restoration staff heals for ~9.4% more than dual wield daggers, but the daggers offer the higher Crit Chance
- If we assume ~58% Crit Healing modifier (4 medium armor pieces), at 30+% health, daggers output ~8.8% more (5.6% + 3.2%) healing, and under 30% health, restoration staff outputs ~6.2% more healing
- The armor is a mix of medium, light, and heavy armor to maximize the Undaunted Mettle passive (+6% to Max Health, Stamina, and Magicka). I recommend running at least 23k armor on frontbar for survivability. With 4 medium, 1 light, 2 heavy (including Gaze of Sithis), and the Nord 2.6k armor passive, I have ~26k armor on frontbar and ~32k on backbar. The chest piece is heavy armor for the extra resistances. If you’re not Nord, I recommend running a 3rd heavy piece on shoulders, legs, or feet since they share the same armor value. The hands should be medium armor and waist should be light due to their low armor values. I don’t advise more than 3 heavy armor pieces as you lose too much damage and sustain, and it’s unneeded given the scaling damage shield from your spammable Brawler
- Tri-Stat is the enchantment for all armor pieces, because Health and both resource pools are essential in PVP, even moreso with hybridization in Update 33 (Ascending Tide) as this build makes significant use of the 2ndary pool (Magicka). The #1 gearing mistake that inexperienced players make in PVP is having Health pools that are too small (e.g. 18-22k); such players get steamrolled because it’s easy to drop their Health into Execute range
- Well-Fitted is the trait for medium and light armor pieces. It is critical for Stamina sustain
- Reinforced is the trait for heavy armor pieces. This boosts your passive mitigation. Impenetrable trait only reduces Crit Damage taken by 2%, so I prefer Reinforced as it mitigates all damage
- As Wretched Vitality provides sustain, trait all 3 jewelry pieces with Infused and enchant with Weapon Damage to increase your damage and healing
- It’s worthwhile to improve your weapons to Legendary (gold) quality, as weapon quality drives all your damage and healing. You’ll want to improve your armor to Epic (purple) quality. It is expensive to improve jewelry but worth getting your jewelry to at least Superior (blue) quality
- For all enchants, it’s well worth using Legendary (gold) quality enchants, as Kuta runes are affordable. You definitely want to use Legendary (gold) quality enchants for Tri-Stat, because Hakeijo runes are very expensive, and you want to maximize the return for your investment
- The frontbar weapon enchantment is Weapon Damage. The backbar weapon enchantments, Poisoned Weapon and Fiery Weapon, see high uptime from Quick Cloak. Every damaging tick of QC procs a backbar weapon enchantment
Preferred Proc Set Mechanics
There are several things that I look for in proc sets
- For damage-dealing proc sets, the ability to affect multiple targets. For single-target builds, there are some terrific proc sets (e.g. Caluurion’s Legacy), but my brawler build is built around AoE damage so I choose accordingly. Rush of Agony meets this criteria
- For damage-dealing proc sets, the ability to refresh an effect on targets without overwriting the damage.
- For buff or buff proc sets, the effect affects my ability to fight multiple targets. By contract, for single-target builds, there are sets such as Caustic Arrow. Gaze of Sithis and Titanic Cleave meet this criteria
- For debuff proc sets, the effect can be applied to multiple targets
- For buff / debuff proc sets, the ability to refresh the effect before it expires. Wretched Vitality meets this criteria
Sets Previously Used
In Updates 33 (Ascending Tide) and 34 (High Isle) I ran with Merciless Charge (MC) and Gaze of Sithis (GoS).
In Update 35 (Lost Depths), MC’s damage was nerfed and damage was lowered across the board. To provide better damage while retaining armor in Update 35, I replaced those sets with MRoM and Agility. In the last month of Update 35, I acquired The Master’s Perfected Maul (Titanic Cleave) and found that it synergized strongly with the mechanics of this build, so I replaced Agility with TC and 1-pc Magma Incarnate for sustain.
In Update 37 (Scribes of Fate), after talking with a very skilled Stamsorc @snoopfriedfrog, I replaced MRoM with GoS, as the latter is more stat dense
3. Skills
Frontbar

- Stampede: gap closer that triggers AoE direct damage and AoE DoT ground effect. Stampede’s AoE DoT damage was nerfed in Lost Depths, but it’s still an excellent skill and it procs Rush of Agony
- Brawler: spammable. I do not recommend using Brawler in PVP unless you have Titanic Cleave, as TC greatly improves the per-target damage of Brawler when it hits multiple targets. Brawler also provides a damage shield that scales based on number of targets hit
- Evil Hunter (EH): +12% Crit Chance, +3% Weapon Damage (Slayer passive), and stealth counter (gigantic 12m radius). I previously slotted Reverse Slice here but found that RS competed with Brawler for the GCD in many situations (i.e. I was taking incoming damage), and EH significantly boosts your burst and sustained damage. I found that EH improved my ability to pressure and kill meaningfully
- Deep Fissure (DF): fires conal AoE direct damage twice after 3 and 9 seconds. This class-defining skill allows you to stack your burst, and it applies both Major Breach and Minor Breach (-8922 armor). Always keep targets in your frontal facing to maximize hitting targets with DF, even while CC’d. While I prefer the timing of the blasts of the other morph, Subterranean Assault, the debuffs from DF offer more value in PVP
- Bird of Prey (BoP): on-demand Major Expedition buff (+30% movement speed). Also passively boosts your damage 5% with Minor Berserk buff. BoP received a buff in Lost Depths to also provide 4-sec immunity to snare and immobilization
- Dawnbreaker of Smiting (DBoS): conal AoE direct damage, stun, and heavy DoT
Backbar
There are 2 strong setups for the backbar. The only difference between them is the HoT skill (shown on button “3”).

Leeching Vines provides lifesteal along with the reactive HoT. The lifesteal is unaffected by Battle Spirit, and it’s many-to-many in effect: multiple enemies can get debuffed and multiple friendlies can lifesteal.

Resolving Vigor provides a potent compact HoT and with Lost Depths Minor Resolve (2974 armor) was inexplicably added as a 20-sec buff.
- Bull Netch: provides Major Brutality buff (+20% weapon damage), Stamina sustain, and passive cleanse
- Ice Fortress (IF): provides Major Resolve buff (+5948 armor) and Minor Protection buff (+5% mitigation). In combat this skill procs both the 260 and the 130 Stamina and Magicka Recovery buffs of Wretched Vitality
- Leeching Vines (LV) or Resolving Vigor (RV): both are worthwhile options. I list their tradeoffs below. I prefer LV as it synergizes with Green Balance passives and can create a lifesteal debuff on multiple opponents
- Arctic Blast (AB): provides a self-heal that scales off offensive stats, stuns targets after a 2-sec delay, and applies a 20-sec PBAoE DoT. Unfortunately in Update 38, the stun was changed to apply after 2 seconds instead of immediately, but it’s still worth slotting in this build
- Quick Cloak (QC): provides Major Evasion buff (-20% AoE damage taken), which is huge. QC provides high uptime on the backbar weapon enchants. The duration of QC was increased by 6 sec in Lost Depths. QC and the backbar weapon enchants account for ~10% of my damage in BGs
- Healing Thicket (HT): low-cost ultimate that provides a burst heal to the lowest-health friendly, then applies a HoT to any friendly who crosses the ground-target AoE, even if they leave that area
Thoughts on Skill Selection
With hybridization, which was introduced in Update 33, LT and AB scale off your highest stats (Stamina or Magicka, Weapon Damage or Spell Damage), so Stamina builds can use Magicka skills with full scaling, and vice versa.
Both Scorch morphs, i.e. Deep Fissure and Subterranean Assault, are viable. SA provides a regular cadence for the blasts. DF provides potent debuffs, Major Breach (-5948 armor) and Minor Breach (-2974). Only recently did I force myself to get used to the 2nd blast timing of DF, and it was worth it.
I previously used Elude in this build but switched to Quick Cloak (QC) given that the duration was bumped from 24 to 30 sec in Lost Isle, and I wanted to have high uptime on my backbar weapon enchants. You can proc one of the backbar enchants with each QC tick. I’ve also found it useful to have 2 on-demand Major Expedition skills (+30% movement speed) that use different resource pools.
Obviously, customize the order of these skills on your skillbars to suit you. As I wrote in my Guide on Keybinding, it’s helpful to order your skillsbased on themes, for ease of muscle memory. E.g. buffs are on 1 & 2, opener (e.g. gap closer) is on 1, spammable is on 2, counters are on 3, AoE damage and AoE heal are on 4, mobility and execute are on 5, etc.
Tradeoffs for the Heal Over Time Skills
I have tested Resolving Vigor, Leeching Vines, and Living Trellis extensively in BGs. All 3 are viable skills.
Of those 3, I prefer Leeching Vines:
- Leeching Vines offsets incoming damage, so it expands the window when you can pressure opponents before having to switch from DPSing to healing
- I used to question the value of the lifesteal (600 per tick) of Leeching Vines in BGs, but after watching footage of myself using it in Lost Depths, there are so many lifesteal ticks that it behaves like a lightweight HoT on multiple allies with 1 cast, so it scales well. The lifesteal output is often double the output from the reactive healing ticks
- Leeching Vines enables you to essentially convert Magicka to Stamina by casting the skill on a friendly taking damage
Following are the pros and cons for Leeching Vines and Resolving Vigor.
Leeching Vines
+++ very high healing output in group fights
++ can proc Accelerated Growth passive for Major Mending (+16% healing done)
++ can proc Nature’s Gift passive (gain 250 of the lower of Magicka or Stamina) when healing others so it’s great for sustain
— requires the target to be hit to trigger the reactive HoT
– for you to benefit from the lifesteal, you and friendlies have to attack a debuffed enemy. So there’s no benefit if you are running away bravely
Resolving Vigor
+++ heals without you being hit
+++ provides Minor Resolve (+2974 armor), so you take less damage that needs to be healed
— can only be cast on self
The big selling point for RV is the armor buff. I play a Nord Warden, so I have the 2.6k racial armor passive. If you play a race with good Stamina sustain, RV is an excellent choice to help get your frontbar armor to 25k or higher without having to load up heavy armor. At any rate, I advise no more than 4 heavy armor pieces.
4. Rotations
Attacking and Crowd Control
The general order for using your attack skills:
Deep Fissure > Stampede > Dawnbreaker of Smiting or Arctic Blast > Brawler
Always refresh DF when it expires. Use Stampede to close the gap to a target and whenever Rush of Agony’s cooldown has expired. Try to weave in light attacks between skills.
Arctic Blast (AB) and Dawnbreaker of Smiting (DBoS) synergize with Rush of Agony (RoA). RoA pulls enemies in when you connect with Stampede, which sets them up to be stunned by DBoS instantly or by AB after a 2-sec delay. That stun increases the likelihood that your targets will get hit by DF’s denotations and RoA’s detonation, and you’re in position to deal heavy AOE damage with Brawler.
RoA’s detonation is centered around you, i.e. it’s PBAoE, not where the Stampede AoE DoT was placed.
RoA can be used to peel enemies off friendlies who are under heavy focus fire. RoA’s animation effectively roots targets for a brief moment (~0.25 sec), so it helps against enemies who are kiting. AB is another great tool for peeling.
Buffing and Healing
Before engaging in combat, always pre-buff by casting Bull Netch, Ice Fortress, Quick Cloak, and your selected HoT skill (Leeching Vines or Resolving Vigor). You’ll want to re-cast IF once you’re in combat to proc both 5-pc set bonuses of Wretched Vitality. Thankfully the 3 buffs have durations of 24–30 sec, so re-buffing is not too tedious with this build.
Remember to keep your buffs up. I shoot for 95+% uptime on buffs (which you can track with meters in addons such as AUI, see below). Before you swap to your backbar to buff, try to work in a DF cast so that while you are buffing, you’re still outputting meaningful AoE damage.
You have 4 sources of meaningful on-demand healing: Leeching Vines, Arctic Blast, Healing Thicket, and Essence of Health (crafted Tri-Stat / Tri-Recovery potion). Use HT and Leeching Vines to bail out friendlies. While this is a damage dealing build, I can’t emphasize enough the value of clutch off-healing to keep your friendlies upright, and healing others triggers the Nature’s Gift passive, which boosts your sustain. I tend to save my potion to replenish not only my Health but also the 2 resource pools as needed.
If you’re out of Magicka, you can spam Bull Netch for some small self-healing via the Bond With Nature passive.
You receive ongoing healing from your healing skills and the Bond With Nature passive, and this ensures the Minor Toughness (+10% Health) from the Maturation passive is always active on you.
Sustain
To maintain high Stamina recovery and Magicka recovery, once in combat make sure to cast a buff (Bull Netch, Ice Fortress, or Quick Cloak) every 15 seconds to proc the buff(s) from Wretched Vitality (WV). Ice Fortress procs both recovery buffs from WV, as IF provides Major Resolve and Minor Protection. WV’s buffs can refresh even while they’re already up, so you can maintain very high uptime easily.
Brawler has a high resource cost, so to maintain high Stamina sustain, cast Leeching Vines on a friendly taking damage. LV enables you to essentially convert Magicka to Stamina via the Nature’s Gift passive.
Ultimate Generation
Here are the main in-combat sources of ultimate generation for this build
- Hidden ultimate generation buff that generates 3 ultimate per second for 9 seconds. This is triggered when you land a light or heavy attack or when you heal a friendly (not yourself). It’s critical that you weave in light attacks between your skills just for this buff alone. Of course, light attacks also provide AoE damage with the Forceful passive in the 2H skill line. You’re also rewarded for healing friendlies with this buff
- Savage Beast passive in the Animal Companions class skill line. This generates 4 ultimate when you use an Animal Companions skill in combat, once every 8 seconds
- Combat Frenzy passive in the Assault skill line. This generates 20 ultimate when you kill an enemy
- Banish the Wicked passive in the Fighters Guild skill line. This generates 3 ultimate when you kill an enemy
The first two sources provide constant generation when you’re engaged in combat, so they do not depend on combat outcomes. By comparison, the last two sources are entirely dependent on your landing the killing blow, so they won’t help until you kill players. At that point, you can snowball ultimate (23 per kill) to fuel your killing spree.
Many players are unaware of the hidden ultimate generation buff; it is the most consistent form of ultimate generation, so don’t neglect it!
5. Attributes, Mundus Stone, Passives, Food, and CP
Attributes
- Magicka: 0
- Health: 0
- Stamina: 64
With the Tri-Stat armor enchants and Gaze of Sithis, you can assign all your attribute points into Stamina and still have over 30k Health in BGs with the Maturation passive.
Mundus Stone
The Atronach: 310 Magicka Recovery
For whatever reason, the Recovery mundus stones provide more stats than the Weapon / Spell Damage mundus stones. So The Atronach is a no-brainer. If you slot Subterranean Assault instead of Deep Fissure, use The Serpent mundus instead.
Passives
Following are the minimum skill point investments to make in passives.
Warden
- Animal Companions: all
- Green Balance: all
- Winter’s Embrace: all
Weapon
- Two-Handed: all
- Dual Wield: all
Armor
- Medium Armor: all
- Heavy Armor: all
Alliance War
- Assault: Continuous Attack, Combat Frenzy
- Support: Combat Medic, Battle Resurrection
Guild
- Fighters Guild: Slayer, Banish the Wicked, Skilled Tracker
- Undaunted: all
Crafting
- Alchemy: Medicinal Use
Racial
- All
Afflictions
If you’re min / maxing, the Undeath passive (Reduces your damage taken by up to 30% based on your missing Health) in the Vampire skill line is regarded as the single strongest passive for PVP in the game.
FWIW, my Warden doesn’t have an affliction and I do fine without it.
Food
The 2 best options
- Bewitched Sugar Skulls: relatively inexpensive to craft, and the recipe is affordable (~70k gold on PC NA). Provides 4620 Health, 4250 Stamina, 4250 Magicka, and 462 Health Recovery
- Artaeum Takeaway Broth: expensive to craft (and recipe is BoP) or buy due to the ingredients. Provides 3326 Health, 406 Health Recovery, 3080 Stamina, and 338 Stamina Recovery
Comparing the net benefits between these 2
- BSS: +1294 Health, +1170 Stamina, +4250 Magicka, +56 Health Recovery
- ATB: +338 Stamina Recovery
After testing both BSS and ATB, for PVP I prefer BSS, as it is more stat dense.
I recently lucked out and got the ATB recipe to drop, ironically from my 2nd fishing cast in Artaeum when I was not seriously trying to get it 🤣. I had previously spent several hours unsuccessfully trying to farm it.
CP
Warfare
- Master-at-Arms: 6% increase to direct damage
- Biting Aura: 6% increase to AoE damage
- Occult Overload: when you kill an enemy under the effects of a status effect, they explode for 5185 Oblivion damage in a 4m radius
- Ironclad: 6% reduction to direct damage taken
Fitness
- Pain’s Refuge: up to 20% reduction to direct damage taken, based on negative effects on you
- Celerity: 10% movement speed
- Sustained by Suffering: 150 Health, Magicka, and Stamina Recovery
- Relentlessness: 10% reduction damage taken (Major Protection) for 3 sec when stunned or feared
Craft
- Steed’s Blessing: 20% movement speed out of combat
- Gifted Rider: 10% mount speed
- Treasure Hunter or Master Gatherer (no impact on PVP)
- Meticulous Disassembly (no direct impact on PVP, but MD helps you farm materials needed to improve your gear)
6. Narrated Videos
These videos are the best way to see this build in action and to understand my thought process in PVP. Keep in mind that this written guide will always have the latest information, whereas videos are a point-in-time snapshot.
A. Build Overview and Deathmatch Gameplay
This video showcases how to blend AoE damage and AoE healing capabilities as the situation warrants.
B. Carrying a Deathmatch with Good Awareness
This video showcases how to carry a team to a huge comeback win.
Carrying in PVP requires 3 things
- A functional build (skills + gear)
- Good awareness
- Solid aim / good targeting
I can’t stress enough how much good awareness contributes to carrying a team!
Errata
- a 210-pt deficit is 14 kills, not 17. I fail at maths 🤣. Still a sweet comeback ✌️
- the opposing warden actually died 10 times, not 3 times
7. Addons
Top Addons for PVP
Here are the top 8 addons that I highly recommend for PVP (in alphabetical order)
- AUI: using modules for scrolling combat text and minimeter.
I use AUI for 2 of its modules. The scrolling combat text is fantastic as it puts skill names to the numbers you see on your screen. The minimeter is very helpful to understand how much your skills and procs are contributing to your overall damage and healing - Azurah: for moving UI elements around.
A usable UI enables good gameplay, and Azurah allows you to position any UI element and resize it. I moved the Health, Stamina, and Magicka bars just below my character, so it’s easy to see my resources without having to look down at the bottom of the screen, which is where they are placed by default - BetterScoreboard: for viewing class, damage, healing, and character names on BG scoreboard.
BetterScoreboard really should be built-in to the game. It’s great for quickly scanning the scoreboard while you’re waiting to respawn, so you can get a handle on how others are faring and whether they’re a healer, DPS, or tank - Cooldowns: to show timers on set cooldowns.
I find this addon indispensable for understanding proc uptime. There is a learning curve in configuring Cooldowns, as you may have to edit the Data.lua file (in the addon’s “src” folder) to add new proc sets or fix existing ones. I uploaded my Data.lua file to Google Drive for your reference - FancyActionBar: to see both action bars. Also includes timers.
This is far better than the default UI, which shows the timers on your other bar. This shows both bars up all the time, with an indicator for which bar you’re on. I found this addon immensely useful for getting used to and growing to like bar swapping in this game - KillCounter: to track kills in PVP and to see kill announcements in chat.
I’m big into having data, and I use the KDR tracking in KillCounter to understand how well a build is performing across BGs. One caveat: the kill counter is sometimes missing some of your kills, but the next addon on this list fixes that - PvPMeter – Updated: to track your kills and deaths accurately. Also tracks the history of your performance across BGs: wins / losses, medal scores, kills, deaths, damage done, healing done, etc.
- VotansMiniMap: Zenimax very deliberately designed the game to have a minimalist UI. It’s an aesthetic choice, but instead of finding it immersive, I find it lacking context and unhelpful. The compass bar on the top of the screen simply doesn’t cut it for any context, let alone PVP where you need to see where your team mates are and the location / status of any flag(s) in land grab games and flag games. VotansMiniMap is therefore absolutely essential, so you don’t have to bring up the map to see what is going on
Full List of Addons
Here are all the addons I use, with my ratings (1/2/3-star). Some of these are for convenience / quality of life
*** AccountSettings: for copying account settings (e.g. Camera, Gameplay, User Interface, etc)
*   AddedInfoFriendList: to see both character name and account name
*   AddedInfoGroupWindow: to see both character name and account name
*   AddedInfoGuildRoster: to see both character name and account name
*** AddedInfoTargetedUnitFrame: to show race and class
*** AlphaGear: for managing gear & skill builds
**  ArmorSkull: to show physical & spell resistances
**  AssistRapidRiding: for auto-swapping movement buff
*** AUI: using modules for scrolling combat text and minimeter
*** Azurah: for moving UI elements around
*** BetterScoreboard: for viewing class, damage, healing, and character names on BG scoreboard
*   BugCatcherUpdated
**  BuiltInGlobalCooldown
**  ChestMaster9000: to mark chests on map (I made a manual fix in LibMapPins-1.0)
*   CleanActionBarBorders: to add a nice border around skills
*   CombatReticle: to show combat state
*** Cooldowns: to show timers on set cooldowns
**  CraftingMaterialLevelDisplay
*** CraftingStations
*   DLQI: to show quest with recent progress
*   EnchantedQuality
*** ExoYsQuickslotAssistant: to prevent quickslot (e.g. potion) from being accidentally changed mid-combat
*** FancyActionBar: to see both action bars. Also includes timers
*** Greyskull: to show weapon or spell damage
*** GrimFocusCounter: for the quintessial Nightblade skill
**  HarvensAliases: for defining aliases to other commands (I made a code change to make aliases global)
*** HarvensImprovedSkillsWindow: to see morphs
*** HarvensTraitAndStyle: to see whether an item's trait has been researched
*** InventoryGridView: WoW-style grid bag
*** ItemBrowser: to see item sets
*** jovAST: to copy addon settings
*** KillCounter: to track kills in PVP and to see kill announcements in chat
*** LoreBooks: locations on map
*** LostTreasure: locations for surveys and treasure
*   MoreStat: to show detailed hidden stats such as penetration, mitigation
**  Overview: to show build on one screen
*** PvPMeter - Updated: to show accurate kill and death totals in BGs. Also tracks historical performance across BGs
*** ScootworksHUD: to show missing food and stable training
*** SkyShards: locations on map
**  SlightlyImprovedExperienceBar: to show an experience bar, a la WoW
**  SpentSkillPoints: to show how many skill points have been spent on skill lines
**  StunBreak
**  USPF: to track skill points
**  VotansImprovedLocations
**  VotansImprovedQuests
*** VotansKeybinder
*** VotansMiniMap
*   VotansTamrielMap
8. Change Log
Here are key changes to the build, listed in reverse chronological order. For brevity, minor copy edits are not included.
- 2023-06-12: given that a 2-sec delay was added to Arctic Blast’s PBAoE stun in Necrom (Update 38), replaced Flawless Dawnbreaker with Dawnbreaker of Smiting for the stun
- 2023-05-26: replaced Markyn Ring of Majesty with Gaze of Sithis. Replaced Subterranean Assault with Deep Fissure for the armor debuffs. To adjust to the higher Magicka usage, switched from Serpent to Atronach mundus. Invested 100% of attribute points into Stamina, given that GoS provides 3276 Health
- 2022-12-04: replaced Reverse Slice with Evil Hunter, as I found that EH improves my ability to pressure and kill meaningfully. Also changed from using 3 heavy and 4 medium to 2 heavy, 1 light, and 4 medium to maximize the Undaunted Mettle passive
- 2022-11-13: replaced Agility with Titanic Cleave and 1-pc Magma Incarnate, and replaced Dizzying Swing with Brawler. I was delighted to get the Perfected TC Maul from vDSA and found that it synergizes terrifically with this build. Here’s why: Brawler with TC provides scaling AOE damage and a scaling damage shield
- 2022-09-24: replaced Absorb Stamina weapon enchantment with Fiery Weapon for the direct damage and DoT. Quick Cloak and the backbar enchants now account for ~10% of my damage
- 2022-09-21: given that Arctic Blast provides an on-demand PBAoE stun, I replaced Dawnbreaker of Smiting with Flawless Dawnbreaker. FB has lower tooltips on the direct damage and DoT compared to DoS, but the 300 Weapon Damage buff for 20 sec is well worth it
- 2022-09-03: to better leverage backbar enchants, I replaced Elude with Quick Cloak. I also replaced a Frost weapon enchantment on the backbar with Absorb Stamina, to help with sustain. Added tradeoffs when selecting one of the following HoT skills: Leeching Vines, Living Trellis, or Resolving Vigor. I’ve experimented with all 3 extensively and now prefer Leeching Vines
- 2022-08-28: in service of generating more damage, I replaced Merciless Charge and Gaze of Sithis with Markyn Ring of Majesty and Agility. The tradeoff to gain more damage is worth it in Lost Depths, given that kills are harder to come by, MC was nerfed, and damage is lower across all classes
- 2022-08-24: replaced Enchanted Growth with Arctic Blast (AB), given that AB was changed in Lost Depths (Update 35) to provide a class PBAoE stun. You lose off-healing and sustain, but the stun complements Rush of Agony and greatly improves the build’s performance
- 2022-06-19: replaced Resolving Vigor with Living Trellis (LV), given LV potentially heals for significantly more over a longer window, can be cast on friendlies, and uses Magicka
- 2022-06-19: after extensive testing with Titanborn Strength (TBS) in Battlegrounds, I missed the positional control of Rush of Agony (RoA), so I switched from TBS back to RoA. Remember, RoA acts as a mini AoE root effect
- 2022-06-13: in High Isle (Update 34), multiple classes had their damage meaningfully buffed (e.g. Stamsorc, Stamblade) and the new Oakensoul Ring is overpowered, so it’s been harder to stay alive. Therefore, I replaced Rush of Agony (RoA) with Titanborn Strength (TBS), as the latter’s 5-pc set bonus of TBS boosts Weapon Damage and Offensive Penetration as your Health drops, which increases not only your damage but also your healing

Updated per Update 34 (High Isle, patch 8.0.5):
https://forums.elderscrollsonline.com/en/discussion/comment/7612725/#Comment_7612725
The Warden changes in High Isle have zero affect on this build.
2H skill line’s Reverse Slice got buffed:
This change should improve the performance of Reverse Slice so I look forward to trying it out ✌️
The nerfs to the Warfare constellations affects all builds that use it.
Updated the Recent Notable Changes section with the following:
Updated again for High Isle. Changed the Recent Notable Changes section to this:
So I’ve gone back to my pre-High Isle gear sets but swapped out Resolving Vigor with Living Trellis, as the latter is better against incoming focus fire.
Nice! I am currently grinding out Sithis to try this build. My weapon is currently the rush of agony hammer before I get a better option. I just hit cp300 so there is some ways to go :) But this build is exelent to have as an ingame goal! Had to grind out scrying, I really like it, and then I have to do some of the Dark Brotherhood story to get Sithis! I’m all in :) Thank you again for this guide!
Hopefully you’re all geared up now.
Let me know how things are going with the build!
Still working on it, got distracted leveling a stamsorc 😅 Trying to get the last leads for Sithis to drop.
What are you up to ingame, is summer = a break for you?
I’m still playing regularly.
I’ve been keeping an eye on the massive changes coming in Update 35. I would prefer that ZoS revert most of them as I think incremental change is much more effective (and easier to assess for ZoS and players) as opposed to the planned massive changes that were put on the PTS.
Updated the Recent Notable Changes section with the following:
It’s awesome to FINALLY have a class stun, and it complements this build’s bully nature.
In service of generating more pressure and bursting targets down, I replaced Merciless Charge and Gaze of Sithis with Markyn Ring of Majesty and Agility. The tradeoff to gain more direct damage is well worth it in Lost Depths, given that kills are much harder to come by. Farewell Merciless Charge and Gaze of Sithis, you served me well!
For reference, my old (now outdated) gear sets are listed below…
Frontbar
1-pc Gaze of Sithis¹
2-pc Merciless Charge
5-pc Rush of Agony
1-pc Velidreth²
3-pc Wretched Vitality
Backbar
1-pc Gaze of Sithis¹
5-pc Rush of Agony
1-pc Velidreth²
5-pc Wretched Vitality
¹ You can replace Gaze of Sithis and the shoulders with 2-pc Magma Incarnate for group utility. Alternatively, you can replace Gaze of Sithis with Markyn Ring of Majesty for more damage
² Any monster set shoulders with weapon / spell damage will work: Balorgh, Kjalnar’s Nightmare, Molag Kena, Nerien’eth, Prior Thierric, or Velidreth
To gain mitigation, I replaced Living Trellis with Resolving Vigor. To better leverage backbar enchants, I replaced Elude with Quick Cloak. I also replaced a Frost weapon enchant on the backbar with Absorb Stamina, to help with sustain
I find with this new setup that I have to monitor my Stamina pool more carefully, but the overall build performance is better.
Last week I replaced Resolving Vigor for Leeching Vines. LV’s lifesteal ends up generating a lot of healing in group fights.
Updated the guide to explain the pros and cons for Leeching Vines, Living Trellis, and Resolving Vigor. All are viable options, it’s really a matter of what you’re optimizing.
Over a week ago, given that Arctic Blast provides an on-demand AOE stun, I replaced Dawnbreaker of Smiting with Flawless Dawnbreaker. FB has lower tooltips on the direct damage and DoT compared to DoS, but the 300 Weapon Damage buff for 20 sec is well worth it.
I now feel confident in recommending FB over DoS.
The Brawler build now uses the Brawler skill!
Replaced Agility with Titanic Cleave and 1-pc Magma Incarnate, and replaced Dizzying Swing with Brawler.
I was delighted to get the Perfected TC Maul from vDSA in early October and found that it synergizes terrifically with this build. Here’s why: Brawler with TC provides scaling AOE damage and a scaling damage shield. Without TC, Brawler is not worth using in PVP due to the low per-target damage.
Keep in mind that Brawler has a high resource cost. To help with sustain, remember to cast Leeching Vines on a friendly player. This essentially converts your Magicka to Stamina as your friendly gets hit and triggers the reactive heal.
I’ve been meaning to update this guide for a month and finally got around to it. Happy cleaving with Brawler and Titanic Cleave!
Hello, i am not that experienced in Builds and i am wondering if the 5 piece Effect from Wretched Vitality is still active, when activated with ICE Fortress on Backbar, when i switch to my Frontbar, or do i only have the extra sustain on the Backbar?
Yes, the buffs from Wretched Vitality carry over from the backbar to the frontbar. The WV buffs are yellow icons of a person with cross swords. You’ll see they persist regardless which bar you’re on, until they expire (15s).
One really nice feature of WV is that the buffs can be refreshed any time. Some sets have procs that can’t be refreshed until the duration expires, e.g. Seventh Legion Brute.
This is a great build with an even better explanation, thank you for sharing this! I’ve mained a Stam Warden in PvP since soon after the class came out and looking for a refresh, so this guide is very much appreciated.
Appreciate the feedback!
Glad to hear the explanation was helpful. Sometimes I wonder if it’s too much information. But better too much than too little IMO.
This build is the most fun (and effective) of any I’ve tried over the past 2.5 years on my Stamden main.
Several big changes last week:
1. replaced Markyn Ring of Majesty with Gaze of Sithis
2. replaced Subterranean Assault with Deep Fissure for the armor debuffs
3. To adjust to the higher Magicka usage, switched from Serpent to Atronach mundus
4. Invested 100% of attribute points into Stamina, given that GoS provides 3276 Health
With the addition of a 2-sec delay to Arctic Blast’s stun, replaced Flawless Dawnbreaker with Dawnbreaker of Smiting.
I’ve adjusted my rotation to pop Arctic Blast before Stampede, that way it triggers around the time I arrive at the target. I had to move it to the 2H bar since bar swap is often slow in Cyrodiil, and replaced Bird of Prey with Crystalized Shield on the DW bar (I like it since I mainly play Cyrodiil and always around keeps). At least Camouflaged Hunter gives the Minor Bezerk some of the time. I like all of the buffs on the back bar since I’m not the fastest player. I like your changes for Necrom, just saw this, I’ll try it out.
Do the ticks of Arctic Blast after the first also stun? I had assumed based on the wording that the stun triggers on targets at activation, albeit with a 2-sec delay.
I think Bird of Prey is a must-slot skill, because it provides immunity to roots and snares and has an unusually long duration for a Major Expedition skill.
I’ve tested this (can be done on ads anywhere) and it definitely works, where the stun occurs around you (6 m radius) at the conclusion of the two-second delay. The timing is certainly trickier though, and it’s hard to line up AB to hit with shalks and Stampede in the 2-3 second window, especially in Cyrodiil and on PS5.
No doubt I miss Bird of Prey on the front bar, I just couldn’t reliably bar swap twice (in Cyrodiil on PS5) in that short window, so I needed AB on the front bar. I’m still deciding on the back bar between Deceptive Predator or another skill (passive Minor Evasion is nice from the former, but the speed boost is redundant, and I run immovable pots so I don’t really use the snare removal/immunity much). I like Shimmering Shield to help counter the snipers in the back of groups and get some extra ultimate. But still playing around with this.
I love this build though, thanks for posting and maintaining this. Working on getting gaze of sithis. Still getting use to magicka DPS skills (Deep Fissure) on a stam-based character, I recently came back after 4 years away from the game, so the concept is still strange to me. Makes sense to use it though.
I misunderstood your earlier comment on Arctic Blast. I thought you meant that any tick of AB can stun. It’s only the targets when the ability is cast.
I do understand wanting AB on the front bar so you don’t have to swap weapons to cast it. If you run Immovability pots then your choice makes mechanical sense. I only use tri-pots (Essence of Health) in PVP because it helps so much with sustain.
FWIW, when testing via addons with other classes in BGs, the uptime on the Minor Berserk effect from Camo Hunter was really low, like <10%. Uptime may be higher in Cyro if you hit multiple targets with Deep Fissure.
Gaze of Sithis is a very strong Mythic. Single biggest boost to defense for any gear in the game. Can take a while to get used to not blocking.
Let me know how things go with your Stamden, and thanks for sharing how you build your character and why.
I am able to keep AB in the rotation – DF -> AB -> Stampede -> DB (if available) -> spam Brawler. By the time I lock on to someone and charge in, the AB stun hits at the same time that DF hits and the RoA pull occurs (the same targets do not have to be in the 6-m range when AB is cast). But compared to before the last release, it is tricky to time up due to lag and my own playing ability.
I’m really torn on the two slots on the front bar. Like I said I want AB there just because bar swap doesn’t happen fast enough – I want three skills in two slots. I figured as much with the Minor Berzerk on Camo Hunter (not very good). I could try weaning off the immovable pots and use crit chance pots so I can either move Camo Hunter back bar or ditch it (I really like the reveal capability though) so I can keep Bird of Prey front bar, but yes tri-pots would be ideal. The immovable pots are health, stamina, and immovable, so just missing out on magicka, but that would be helpful with all of the magicka skills. I don’t HA/LA enough to run Lotus Blossom for crit chance.
Gaze of Sithis sounds great – I rarely block anyways, with this build I can roll dodge all day.
What do you think about the changes to Maelstrom 2H weapon vs. Masters 2H?